August 24, 2018
HTTPS to SSH Key
Often I need to change a git repository to use an SSH key instead of my username and password to authenticate with the remote server. In order to do so, type the following in the repository’s folder on your machine:
$ git config remote.origin.url git@github.com:username/repository_name.git
(Make sure to include the .git at the end of the repository name.)
SSH Key to HTTPS
In order to change it to do the reverse, type:
$ git config remote.origin.url https://github.com/username/repository
August 23, 2018
Often I find myself wanting to have an easy way to SSH into a server on a Windows PC. Unfortunately, SSH keys on Windows can often be a challenge, but there’s an easy way to have PuTTY connect without needing to type in a password every time.
To create a shortcut for a PuTTY connection to automatically log in, you only need two things: the name of the profile (in PuTTY) that has the connection and appearance settings, and the password to your account (for the server). Right click on the desktop to create a new shortcut, then for the link type:
"C:\Program Files (x86)\PuTTY\putty.exe" -load "<profileName>" -pw "<password>"
If you saved PuTTY to a different location other than Program Files (x86), then you’ll also need to change the location of putty.exe in the command above.
Once you’ve created the shortcut, you can pin it to the taskbar or the start menu for easy access!
These instructions were inspired by the instructions for the Purdue ECE 264 course page.
July 29, 2018
My blog is currently hosted using GitHub Pages—which is a great way to host your static site or blog for free—by linking it to my custom domain that I purchased through Hover. While both of these services are amazing, connecting the two required many open tabs and several waiting periods. This post will explain the steps needed to point a GitHub Pages repo to a custom domain on Hover.
Preflight Check
Before connecting GitHub Pages to a custom domain, I first updated my blog on my repository nickymarino.github.io, and checked that it was displaying properly at its default website (normally https://nickymarino.github.io).
Link the Repo to the Domain
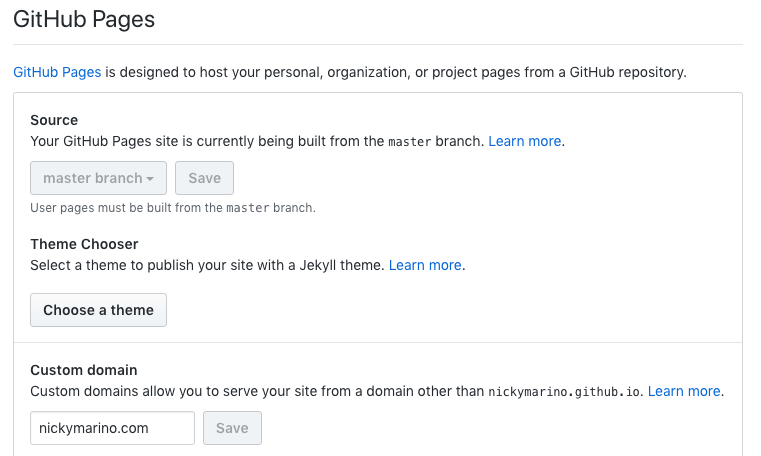
First you need to update your repository with your custom domain. In the settings for the repo, enter the domain in the “Custom domain” in the GitHub Pages section.
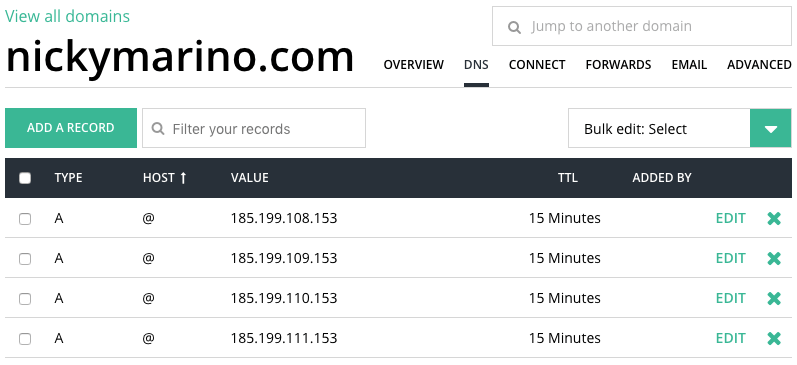
A Records on Hover
The next step is to configure Hover. Find GitHub’s current list of IP addresses to create records with. Then, go to your Hover account, select your domain, and go to the DNS tab) to add to the DNS tab on Hover. At the time of writing, these are:
185.199.108.153
185.199.109.153
185.199.110.153
185.199.111.153
Then, go to your Hover account, select your domain, and go to the DNS tab. Delete any DNS records that have an “A” under “Records”.
For each IP address on GitHub’s help pages, add a DNS record. For each, the “Type” will be A, the “Hostname” will be @, and the “TTL” can be left as the default value.
It may take several hours (or up to about a day) for the changes to take effect. Take a break, get some sleep, and then come back to your domain to make sure everything’s working. Now we can enforce HTTPS!
Create HTTPS certificate
If you head back to your repo’s settings page to enforce HTTPS, you might see the following “not yet available” error:
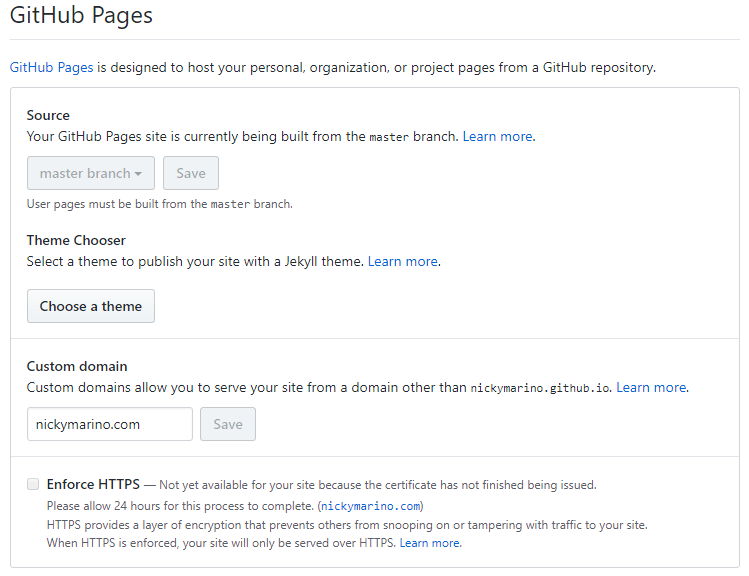
Per GitHub’s troubleshooting page, you need to remove and then re-add your custom domain for your repository. Wait around 24 hours for the certificate to be generated, and you should be good to go!